
Authorization with JWT

Software Engineer at Cars24
Authorization and Authentication go hand in hand. With authentication we take a username and password and check if any user with those credentials actually exist. It's like logging a user in. While with authorization we ensure that the user making the request to our server is the same user that logged in during the authentication process. It's like authorizing the user to access data from the server.
Earlier the authorization process was implemented using session cookies but modern authorization methods make use of tokens i.e JWT (JSON Web Token).
In this article we'll learn how JWT method is different from traditional method of session cookies, the benefits of using JWT and a demo to implement a JWT authorization so that you can also add authorization to your applications.
So, let's get started !!
Session Cookies v/s JWT
Let's look at a diagrammatic representation of traditional authorization that uses session and cookies
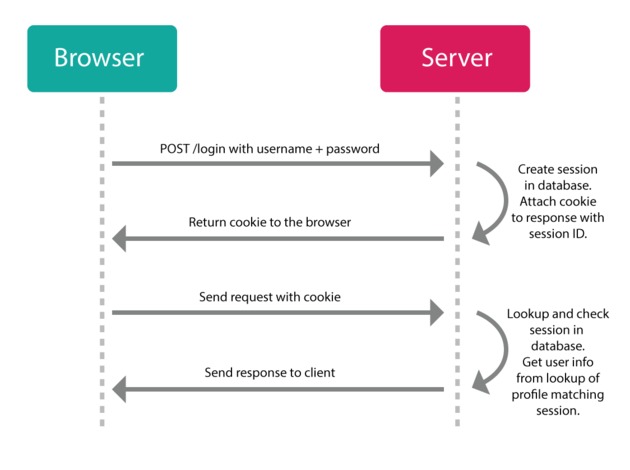
So the first thing that happens here is that our user logs in by posting their email and password to the server. The server then authenticates that the user is correct and if it that user actually exist in the server database, the server is going to create a session for that user in the server memory where the user gets stored and sends a response back to the client along with a session ID (this id corresponds to the user session on the server) as cookie. The browser stores this cookie and sends it to the server every time it makes a request.
Now when the client needs to make another request like the going to a new page in the application, the request is sent along with the cookie to the server. Now the server is going to perform a lookup for that particular session ID to find if a session with that particular ID exist and who is the user in that session. Once the user is found it authorizes if the user can access that particular data and if the user is authorized appropriate response is sent back.
This is how we used to do it. But there exist another method to implement authorization which most of the developers including me prefer to use i.e via JSON web tokens (JWT).
Let's look at a diagram to understand how JWT works...
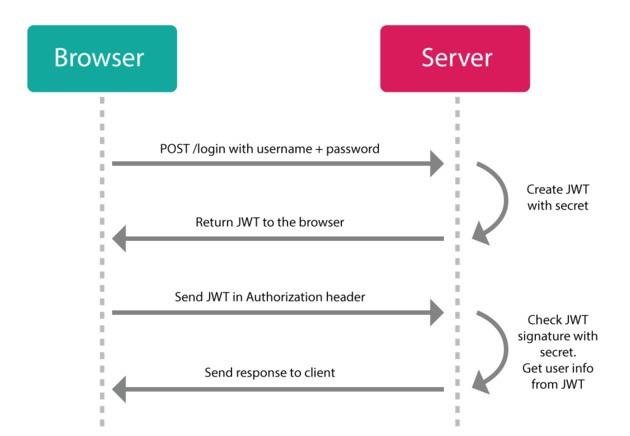
Here also we make a post request in the beginning with username and password to the server. The server authenticates the client but instead of creating a session and storing user in the server memory, what server does is that it creates a JSON web token using user information and its own secret key. The server would know if you tamper this web token, then it would be invalid. The server sends this token back to the client along with the response. The token is stored in the browser and is sent to the server with each subsequent request.
Now when the user makes another request to the server, the server would verify for the authorization token. Once the server has decoded and verified the web token it checks if the user is authorized to access the data and sends appropriate response to the client.
The main difference that you might have noted between the session version and the token version is that in the session version the user information is stored in the session in the server memory. So the server has to do a lookup to find the user each time a request is made based on the session ID. But with the JWT (JSON web token) the user information is stored in the token itself which means the information is stored on the client side and not the server side. If by any chance someone tries to tamper the web token, they would temper the user information and server would know that it is an invalid token.
How JWT stores information
Since in case of json web tokens the user information is stored in the token on the client side, it is advisable to not store any kind of sensitive information( like passwords, account details ) in the token but rather public information such as user ID, user email, username etc.
This is how a JSON web token usually look like:
eyJhbGciOiJIUzI1NiIsInR5cCI6IkpXVCJ9.eyJzdWIiOiIxMjM0NTY3ODkwIiwibmFtZSI6IkpvaG4gRG9lIiwiaWF0IjoxNTE2MjM5MDIyfQ.SflKxwRJSMeKKF2QT4fwpMeJf36POk6yJV_adQssw5c
A JSON web token is comprised of three parts : Headers, Payload and Signature.
jwt.io is a great website to decode and verify your tokens.
The following image shows all the decoded parts of json web token.
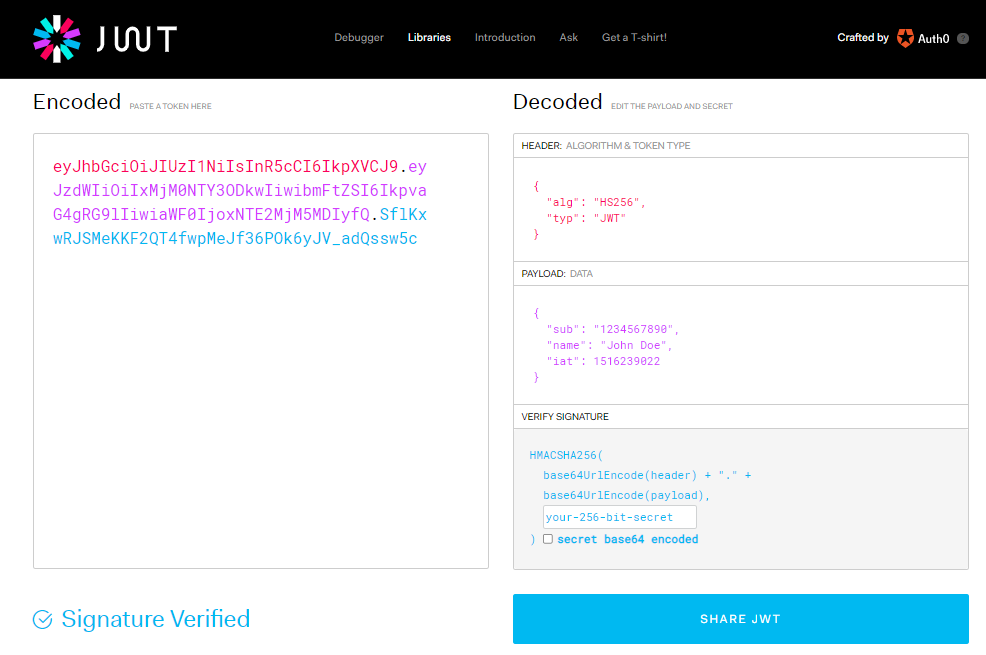
Each part of JSON web token is separated using . operator. The first part: Header comprise of the information like the algorithm used to generate the token, denoted by alg and the type of token, denoted by typ.
The second part of the token: Payload, contains the information being shared to the client like username, userID, issue-date, expiry-date and any such information. It is advisable to have an expiry date on your token else if the token never gets expired then someone might steal it and get hold of your private information.
The third part: Signature, helps us to verify that token has not been tampered before it was sent to the server. To verify the token the server takes the first two parts : the Header and the Payload and encodes them using base64 and then apply the algorithm specified in the header to the encoded part using the server's own secret key to check if the same signature gets generated. If the signature in token and the signature generated are same then token is valid else it's invalid.
This is how you can store information on the client side because without secret key no one would be able to mess with the web token, and the secret key is stored on the server hidden from anyone's access.
Benefits of using JWT
- No Session to Manage: The major advantage of using jwt over session cookies is that the server does not have to store anything. All information is stored on the client side and that too in a secure way.
- Portable: A single token can be used with multiple backends.
- No Cookies Required, So It's Very Mobile Friendly
- Good Performance: It reduces the network round trip time.
Using JWT Authorization
Here I'll show you a quick demo of implementing authorization in your application using jwt. So we're trying to mock an application where a user can log in making api calls and only loggedIn/authorized user can access the data. We'll be creating an express js application (with repl)to mock our server and using Postman for making network calls.
You'll need to install following dependencies in your application for jwt authorization to work: express, jsonwebtoken, bodyparser, dotenv
After you've set up your express js application, it would look something like this:
const express = require('express');
const bodyParser = require('body-parser');

const app = express();
app.use(bodyParser.json());

app.get('/', (req, res) => {
  res.send('Hello Express app!')
});

app.listen(3000, () => {
  console.log('server started');
});
After the setup, let's create our dataset which we'll send to authorized users. I've created a movie dataset with movie-name, director and release date.
const movies = [{
  name:"Avengers",
  director:"Joss Whedon",
  release_year:"2012"
},
{
  name:"Justice League",
  director:"Zack Snyder",
  release_year:"2021"
},
{
  name:"Tenet",
  director: "Christopher Nolan",
  release_year:"2020"
}]
Let's create a demo user as well for authentication and authorization:
const user = {
  id:"123456",
  email:"user@mail.com",
  password: "password123"
}
Now we know that once the user is logged in we'll send a JSON web token to the client. But to generate this token we need a secret key as well. Secret key can be any string or number but to keep it more secure we'll use crypto api to generate a random key. With node enabled in your terminal type the following command and it'll produce a random key:
require('crypto').randomBytes(256).toString('base64')
Store this key in .env file as ACCESS_TOKEN
After setting up the secret key, let's define a route for all the login requests:
app.post('/login',async(req, res)=>{
  try{
     let {email, password} = req.body

    if(email === user.email && password === user.password){
         const userId = user.id
         const accessToken = jwt.sign({userId},
                  process.env.ACCESS_TOKEN, {expiresIn:'24h'})
         return res.status(200).json({success:true, accessToken})
    }else{
        return res.status(401).json({success:false,
                errorMessage:'login failed'})
    }
  }catch(error){
     res.status(500).json({success:false, errorMessage:err.message})
  }
})
This piece of code authenticates the user. Since we've only one user, it'll check if the client is the same user as in our database, and if so it'll create an accessToken (JSON web token) and sign it with userId, server's secret key (process.env.ACCESS_TOKEN) and expiry information (expires in 24 hrs).
The jwt.sign method is used to create the web token. The first argument is the information object which we want to include in the token. Here I only want to include user id hence object with userId: {userId}. The second argument is the secret key stored in .env file. Then are the optional parameters like expiry.
Now if you try to login using any other email and password, you'll get the following output:
{
    "success": false,
    "errorMessage": "login failed"
}
But with the user credentials we defined we'll get the following output:
{
    "success": true,
    "accessToken": "eyJhbGciOiJIUzI1NiIsInR5cCI6IkpXVCJ9.eyJ1c2VySWQiOiIxMjM0NTYiLCJpYXQiOjE2MjQ2MjA2MzUsImV4cCI6MTYyNDcwNzAzNX0.OITJD7GuC48emyzqJKpjBp5F8nsE4y60Gm0n2z7q5OY"
}
You see this is the access-token we received from the server. Now before moving ahead take this accessToken to jwt.io and put it in the encoded section and check out the decoded part. Did you see userId:123456 in the Payload section. Hence our json web token is correctly encoded. If you try to tamper this token it'll show invalid signature. Pretty cool, huh !!!
Moving ahead to access the movie data we'll need to send this accessToken in the request header. For server to verify the user using json web token we'll use a middleware. Although you can define the token verification code inside the route handler as well, but using a middleware would be an optimal choice when more than one route requires authorization.
So I'll define a middleware as authenticateToken to verify my client:
function authenticateToken(req, res, next){
  try{

    const authHeader = req.headers['authorization']
    const token = authHeader && authHeader.split(" ")[1]

    if(!token) return res.status(401).json({message:"unauthorised access"})

    jwt.verify(token, process.env.ACCESS_TOKEN, (err, user)=>{
      if (err) return res.status(403).json({message:"token no longer valid"})
      req.userId = user.userId
      next()
    })

  }catch(err){
    return res.status(401).json({message:"unauthorised access "})
  }
}
So in this middleware I'll first get my authorization header from request and retrieve the token value if any. This splitting to get the token is done because we generally send the token in headers in the following format Bearer <token>:
Bearer eyJhbGciOiJIUzI1NiIsInR5cCI6IkpXVCJ9.eyJ1c2VySWQiOiIxMjM0NTYiLCJpYXQiOjE2
If there is no token in the header we'll send a response with 401 status code. If there is a token present we'll decode it using jwt.verify method. This jwt.verify method is doing the same thing as we saw on jwt.io. It'll take the web token, server's secret key and a callback function. This callback function has two parameters: the first is an error for if the token has expired. The other argument is an object. This is the same object on which we signed the web token while logging in {userId}. Since here it is a valid token we get the userId from object and assign it to req and move ahead to our route. This userId can later be used for cases where we need userId to get any information where we need user priviledges or any such cases based on your requirement.
Below is the code to retrieve the movie data:
app.get('/moviedata',authenticateToken,async(req, res)=>{
  res.status(200).json({success:true, data:movies})
})
The moviedata route handler uses the authenticateToken middleware to check if the requesting client is authorized to retrieve data. If so the movie data is sent else not.
Once logged in be sure to make the call to /moviedata with Authorization header in the format Bearer token. Else the request would fail even for authorized client.
That sums it up. This is how you implement authorization using jwt.
To help you understand the code structure here is the repl link with the entire authorization implementation 👉 authorization with jwt repl link
**Make sure to add secret key in .env file before using this repl.
Conclusion
To implement authorization you can either go for session cookies or JSON web Token. With session cookies the information is stored in the session in the server memory and a session ID is sent to the client for future requests. While with JSON web token nothing is stored on the server. All the information is in the token itself which is sent to the client for any later request.
Hope this article helped you understand the authorization mechanism using JSON web tokens.


