


Congratulations🎉🎉 on making it to the final part of "The GraphQL Trilogy".
Moving ahead with our learning, in this article we'll be building the frontend of our application in ReactJS and then make queries to retrieve as well as add new data to our web application.
If this is your first time reading "The GraphQL Trilogy", you can access part 1 👉 here and part 2 👉 here.
So let's get started...
Application Setup
To start with app setup, navigate to the client folder and run the below mentioned command. It'll create a boilerplate react app.
yarn create react-app ./
This might take some time. After your app setup is complete navigate to App.js file, it should look something like this.
function App() {
  return (
    <div className="App">
        React App
     </div>
  );
}

export default App;
You can start the app using:
yarn start
Make sure the frontend and the server are running on different ports else it would cause issues.
Apollo Client
When we are working with RESTful apis, in order to make an HTTP request we could use a library like axios or fetch to help us make those requests. When it comes to graphQL, to make queries we'll need a graphQL client: Apollo.
Apollo Client is a comprehensive state management library for JavaScript that enables you to manage both local and remote data with GraphQL. Use it to fetch, cache, and modify application data, all while automatically updating your UI.
Though graphql query language looks very much like javascript, it's not. So react does not understands it. So to bind graphql language to our react framework, we require a graphql client which is Apollo.
To start with apollo client installation, execute the below command:
yarn add @apollo/client graphql
@apollo/client: This single package contains virtually everything you need to set up Apollo Client. It includes the in-memory cache, local state management, error handling, and a React-based view layer.graphql: This package provides logic for parsing GraphQL queries.
Now to initialise the apollo client add the below mentioned code to your App.js file:
import { ApolloClient,
ApolloProvider,
InMemoryCache } from '@apollo/client'

// apollo client setup
const client = new ApolloClient({
  uri: "http://localhost:4000/graphql",
  cache: new InMemoryCache()
})

function App() {
  return (
    <ApolloProvider client={client}>
      <div className="App">
        <h1>Book App</h1>
      </div>
    </ApolloProvider>
  );
}

export default App;
Here we've initialised the apollo client using the ApolloClient constructor with an object containing fields: uri and cache.
uri: It specifies the URL of our GraphQL server, the supercharged endpoint.cache: It is an instance of InMemoryCache, which Apollo Client uses to cache query results after fetching them.
You connect Apollo Client to React with the ApolloProvider component. Similar to React's Context.Provider, ApolloProvider wraps your React app and places Apollo Client on the context, which enables you to access it from anywhere in your component tree.
That's it! Our client is ready.
Fetching With GraphQL
Now that we've setup our graphql client, let start with fetching data from our graphql server.
As we were making queries in graphiql to retrieve data, we'll be making the similar queries here as well. Create a folder named queries inside your current directory and add a file named queries.js to it. This file would contain all our queries for our app.
Add the below query to this file.
import {gql} from '@apollo/client'

export const getBooksQuery = gql`
{
    books{
        name
        genre
        id
    }
}
`
This is our first query to get all the details for all the available books. We should always wrap graphql query string with gql(A JavaScript template literal tag that parses GraphQL query strings).
Now create a BookList component to display all the books records.
import { useQuery } from '@apollo/client'
import { getBooksQuery } from '../queries/queries'

const BookList = () => {
    const { loading, error, data } = useQuery(getBooksQuery)

    if (loading) return <p>Loading...</p>;
    if (error) return <p>Error :(</p>;
    return <>
        <div className="flex">
            <div className="flex-item-left">
                <div className="page-head">Book List</div>
                <div className="book-container">
                    {
                        data?.books?.map(item => {
                            return <div key={item?.id} className="book-tile" >
                                <div className="book-tile-head">{item?.name}</div >
                                <div className="book-tile-sub">{item?.genre}</div>
                            </div>
                        })
                    }
                </div>
            </div>
        </div>
    </>
}

export default BookList
The useQuery React hook is the primary API for executing queries in an Apollo application. To run a query within a React component, call useQuery and pass it a GraphQL query string. When your component renders, useQuery returns an object from Apollo Client that contains loading, error, and data properties you can use to render your UI.
As our query executes and the values of loading, error, and data change, the BookList component can intelligently render different UI elements according to the query's state:
- As long as
loadingistrue(indicating the query is still in flight), the component presents a Loading... notice. - When loading is
falseand there is noerror, the query has completed. The component renders a list of books returned by the server.
Add this BookList component to the main app component and check the newly rendered UI.
easy-peasy😎😎😎
Mutating with GraphQL
Now that we've learned how to query data from our backend with Apollo Client, the natural next step is to learn how to modify back-end data with mutations.
So let's first write our query in the queries.js file
export const addBookMutation = gql`
mutation($bookname:String,$genre:String,$author:ID){
    addBook(name:$bookname,genre:$genre, authorId:$author){
        name
        genre
        id
    }
}
`
You can see the mutation query is somewhat different from the one we used with graphiql. We start with the mutation keyword along with the arguments we'll be passing with their datatypes like string or ID type. Then is the addBook function from our graphql-server wherein we pass the arguments and also specify the fields we wish to see of the returned object.
Also we'll create another query to get all authors:
export const getAuthorsQuery = gql`
{
    authors{
        name
        id
    }
}
`
Our mutation queries are done!!
After writing the mutation queries we'll create our AddBook component.
import { useQuery, useMutation } from '@apollo/client'
import { useState } from 'react'
import { getAuthorsQuery, addBookMutation, getBooksQuery } from '../queries/queries'

const AddBook = () => {
    const { data } = useQuery(getAuthorsQuery)
    const [addBookFunction, { data: addBookResponse }] = useMutation(addBookMutation)
    const [formState, setFormState] = useState({
        bookname: "",
        genre: "",
        author: ""
    })

    return <>
        <form id="add-book">
            <div className="field">
                <label>Book name:</label>
                <input type="text" onChange={(e) => {
                    setFormState(formState => ({ ...formState, bookname: e.target.value }))
                }}
                    value={formState.bookname} />
            </div>
            <div className="field">
                <label>Genre:</label>
                <input type="text" onChange={(e) => {
                    setFormState(formState => ({ ...formState, genre: e.target.value }))
                }}
                    value={formState.genre} />
            </div>
            <div className="field">
                <label>Author:</label>
                <select onChange={(e) => {
                    setFormState(formState => ({ ...formState, author: e.target.value }))
                }}
                    value={formState.author}>
                    <option>Select author</option>
                    {data?.authors?.map(author => {
                        return <option key={author.id} value={author.id}>{author.name}</option>
                    })}
                </select>
            </div>
            <button
            className="btn-add"
            onClick={(e) => {
                e.preventDefault()
                // console.log(formState)
                addBookFunction({
                    variables:
                    {
                        bookname: formState.bookname,
                        genre: formState.genre,
                        author: formState.author
                    }
                })

                setFormState(formState => ({ ...formState, bookname: "", genre: "", author: "" }))
            }}>+</button>

        </form>
    </>
}

export default AddBook
Here we've created a form to take user inputs to add more books. Our form contains fields for BookName, Genre and Author. To display the available authors we're again using the useQuery hook.
In order to add new record we're using the useMutation hook. The useMutation React hook is the primary API for executing mutations in an Apollo application.
To execute a mutation, you first call useMutation within a React component and pass it the mutation you want to execute.
As shown above, you use the gql function to parse the mutation string into a GraphQL document that you then pass to useMutation.
const [mutateFunction, { data, loading, error }] = useMutation(GRAPHQL_MUTATION_QUERY_STRING);
When your component renders, useMutation returns a tuple that includes:
A mutate function that you can call at any time to execute the mutation.
- Unlike useQuery, useMutation doesn't execute its operation automatically on render. Instead, you call this mutate function.
An object with fields that represent the current status of the mutation's execution (data, loading, etc). This object is similar to the object returned by the useQuery hook.
In our code example our mutate function is addBookFunction. So in the form, the onClick event executes this mutate function. We pass in all the required arguments as fields to the variable object. When the button is clicked the addBookFunction is executed.
That's it 😀😀!! Try adding a new book record.
But hold on. There's one unexpected behaviour in our app. On adding a new book the book list is not getting updated. We need to fix this.
There's a slight change we need to make in our useMutation hook, which is adding the refetchQueries attribute.
const [addBookFunction, { data: addBookResponse }] = useMutation(addBookMutation, {
        refetchQueries:[
            getBooksQuery
        ]
    })
So this is how our hook would look like now. The refetchQueries field executes all the queries specified inside the array after the mutation is complete and all the components using those queries gets updated. Pretty Cool, huh 😱😱😱!!
Getting a Single Record
Up until now we've seen how to fetch all records as well as add a new record. Now we want to add a new feature to our app i.e on clicking on a single book we want to fetch all its details like genre, author name, other books by same author etc.
For this feature, let us first add our new query:
export const getBookQuery = gql`
query($id:ID){
    book(id:$id){
        name
        genre
        id
        author{
            id
            name
            books{
                name
                id
            }
        }
    }
}
`
Here we created a new query by specifying the query keyword along with the type of arguments passed. After that we've just specified the fields we wish to retrieve.
Create a BookDetails component to display the retrieved book details:
import { useQuery } from '@apollo/client'
import { getBookQuery } from '../queries/queries'


const BookDetails = ({ id }) => {
    const { loading, error, data } = useQuery(getBookQuery, {
        variables: { id }
    })

    if (loading) return <p>Loading...</p>;
    if (error) return <p>Error :(</p>;
    return <>
        <div id="book-details">
            <p className="book-det">Book Details: </p>
            {
                data ? <div>
                    <div className="book-section">
                        <div className="book-name">{data?.book?.name}</div>
                        <div className="book-genre">{data?.book?.genre}</div>
                        {data?.book?.author?.name && <div className="author">Author: {data?.book?.author?.name}</div>}

                        <div className="flex">
                            {
                                data?.book?.author?.books?.map(item => {
                                    if(!item?.name) return null
                                    return <div key={item?.id} className="book-item">{item?.name}</div>
                                })
                            }
                        </div>

                    </div>
                </div> : <></>
            }
        </div>
    </>
}

export default BookDetails
Here the component receives the id prop and based on that id prop we're fetching the details of the book using useQuery hook. This is very much similar to what we saw earlier in the BookList component.
Now we also need to make some updates inside our BookList component so that clicking on each book displays its details.
Below is the updated BookList Component.
import { useQuery } from '@apollo/client'
import { useState } from 'react'
import { getBooksQuery } from '../queries/queries'
import BookDetails from './BookDetails'

const BookList = () => {
    const { loading, error, data } = useQuery(getBooksQuery)
    const [selectedBook, setSelectedBook] = useState("")

    if (loading) return <p>Loading...</p>;
    if (error) return <p>Error :(</p>;
    return <>
        <div className="flex">
            <div className="flex-item-left">
                <div className="page-head">Book List</div>
                <div className="book-container">
                    {
                        data?.books?.map(item => {
                            if (!item.name) return null
                            return <div key={item?.id} className="book-tile"
                            onClick={() => {
                                setSelectedBook(item.id)
                                }}>
                                <div className="book-tile-head">{item?.name}</div >
                                <div className="book-tile-sub">{item?.genre}</div>

                            </div>
                        })
                    }
                </div>
            </div>
            <div className="flex-item-right">
                <BookDetails id={selectedBook} />
            </div>
        </div>
    </>
}

export default BookList
Our App component looks something like this:
import { ApolloClient, ApolloProvider,InMemoryCache } from '@apollo/client'
import AddBook from './components/AddBook';
import BookList from './components/BookList';


// apollo client setup
const client = new ApolloClient({
  uri: `http://localhost:4000/graphql`,
  cache: new InMemoryCache()
})

function App() {
  return (
    <ApolloProvider client={client}>
      <div className="App">
        <BookList />
        <AddBook />
      </div>
    </ApolloProvider>
  );
}

export default App;
The only thing left is to add some CSS to make our app look beautiful. Mine looks like this:
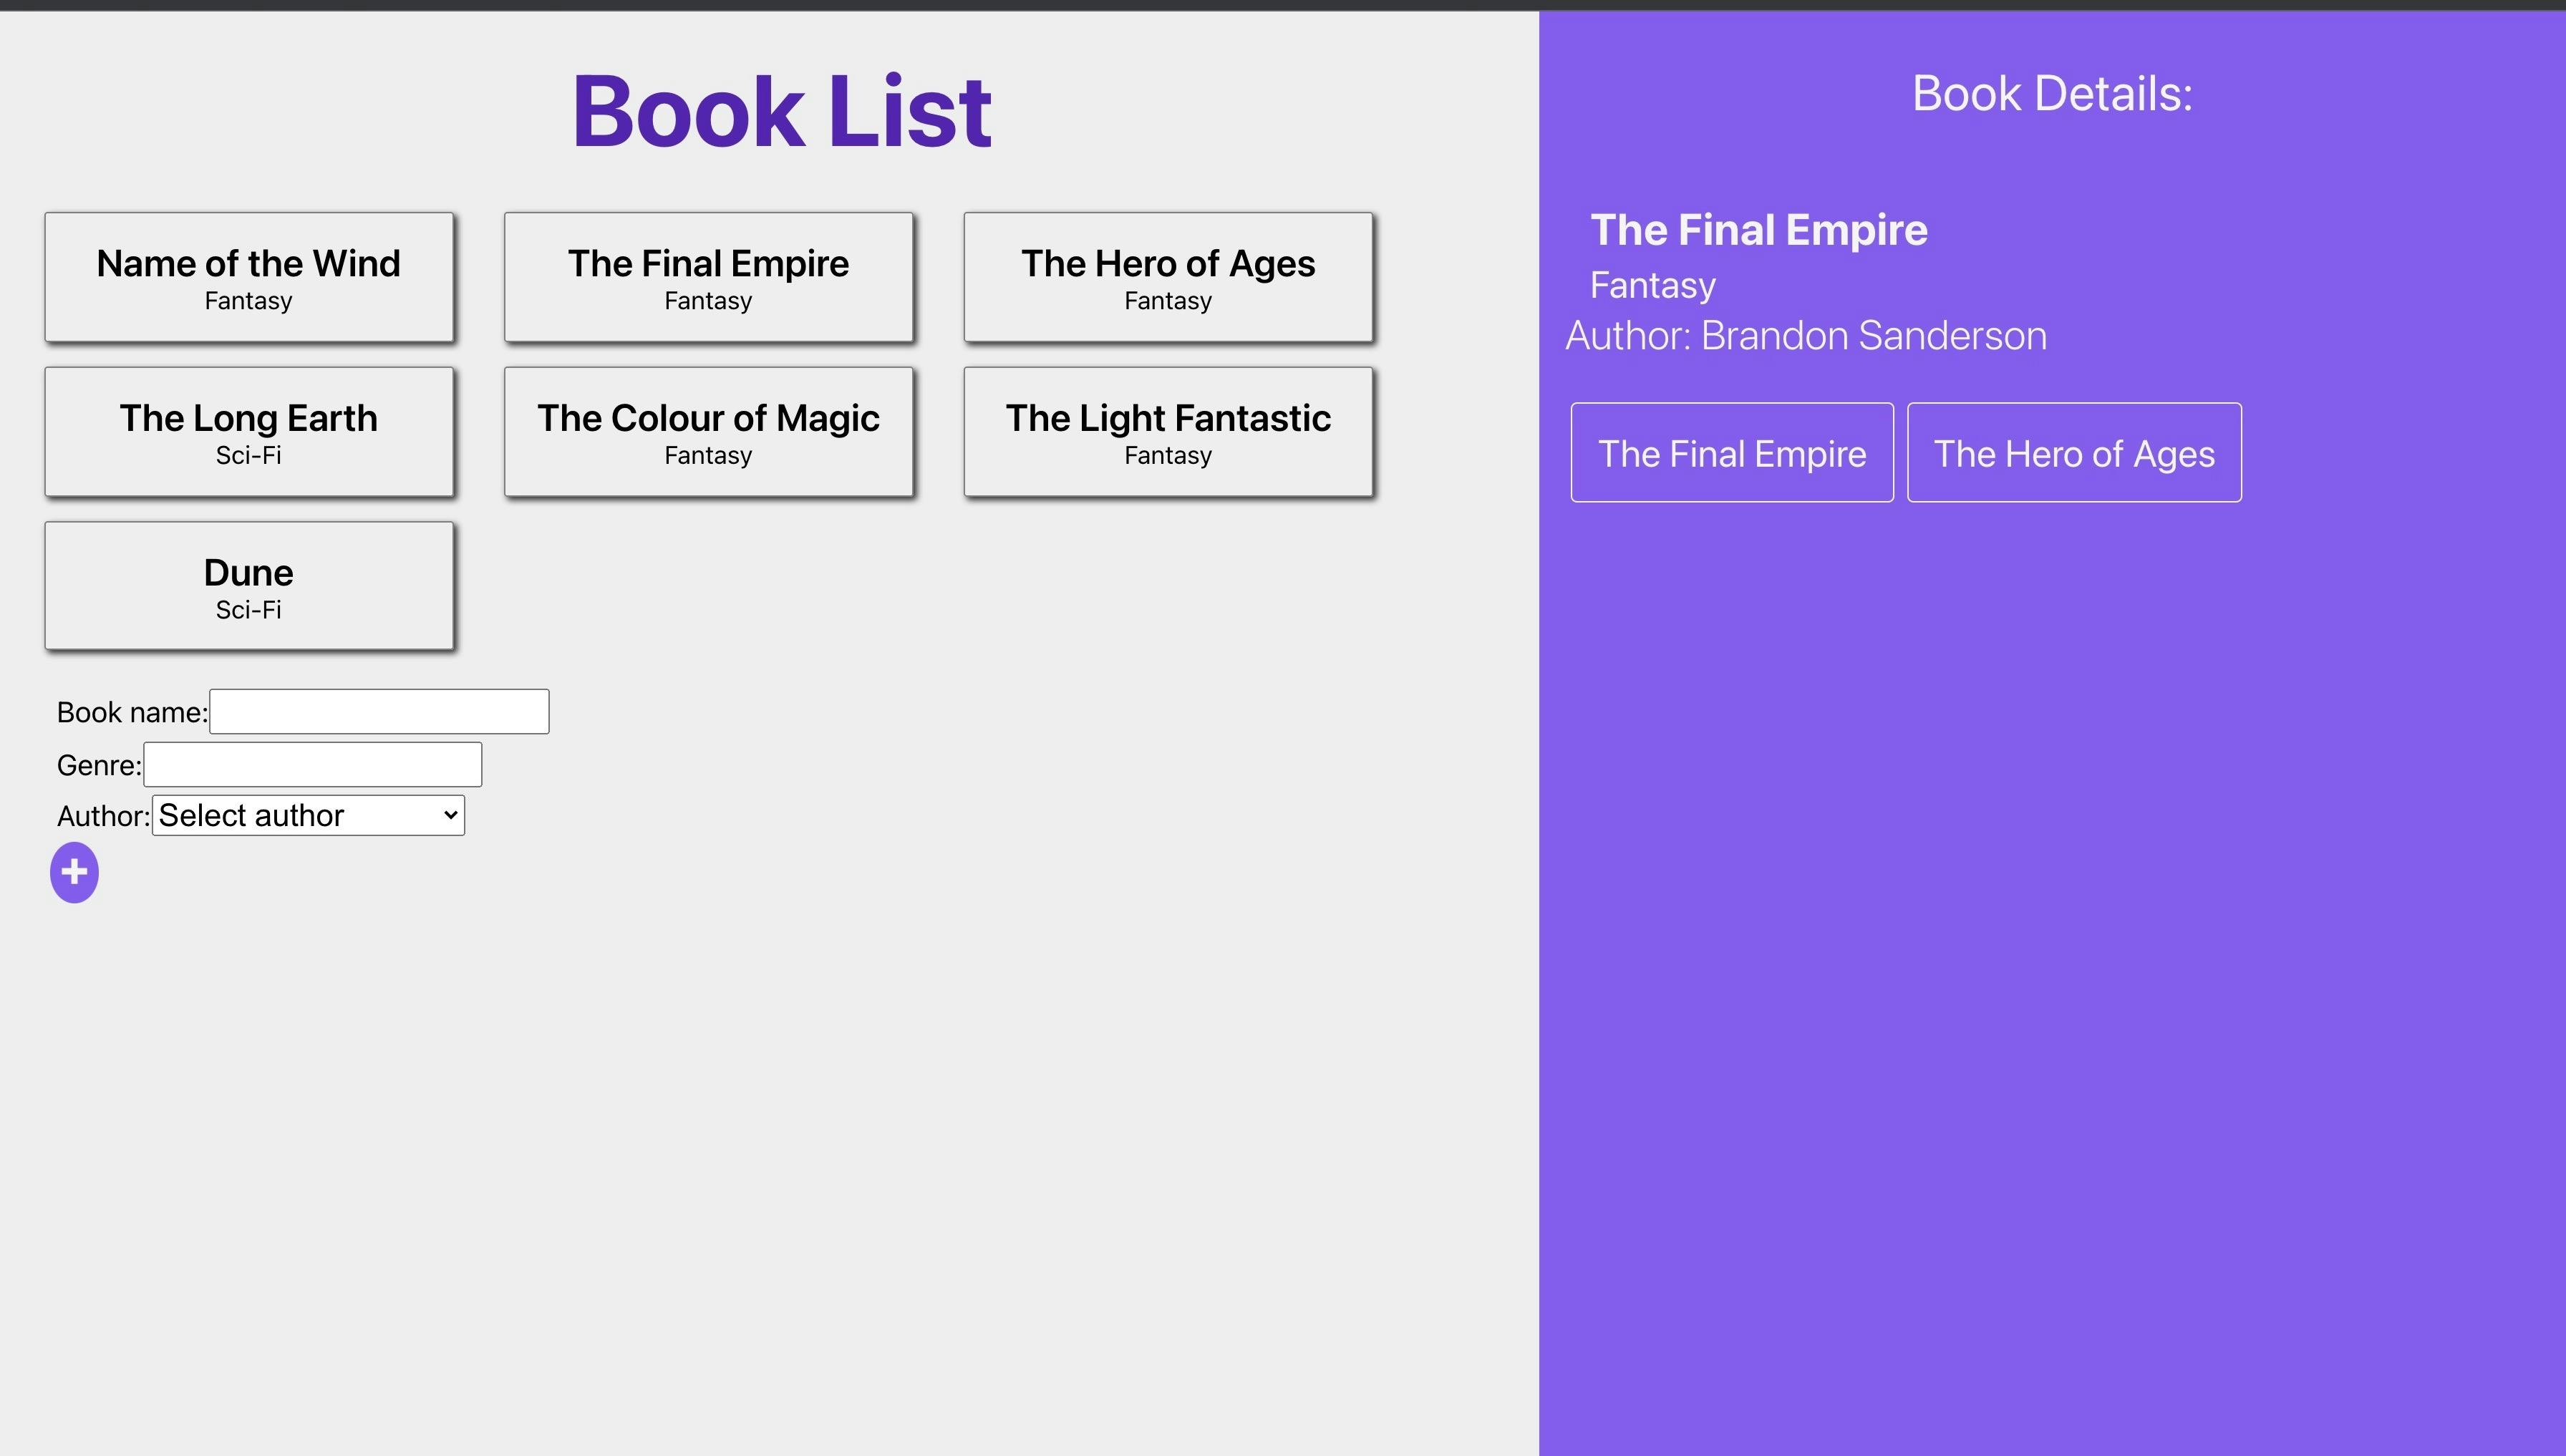
That's your creativity!! Do share your screenshots of the web application.
Conclusion
In this article we added frontend with ReactJs to our web application. We started by setting up the Apollo Client for our application. Then we wrote queries to fetch as well as mutate data on the graphql server. After that we created some components to display the fetched records for books and add new book as well.
Hope you enjoyed this small series on graphQL.
Read more about Apollo client
au revoir✌️✌️